Building the harness around our coding agents: eight failure modes, eight pillars
Notes on the harness we built around Claude Code and Codex, organized as eight coding agent failure modes and eight harness pillars.
Teams building with AI usually end up building two products: the thing they ship, and the system around their agents that makes them useful in building the thing they ship.
We built such a system to help us ship Nimbalyst. We call it our team harness. This post is about what we learned from doing it.
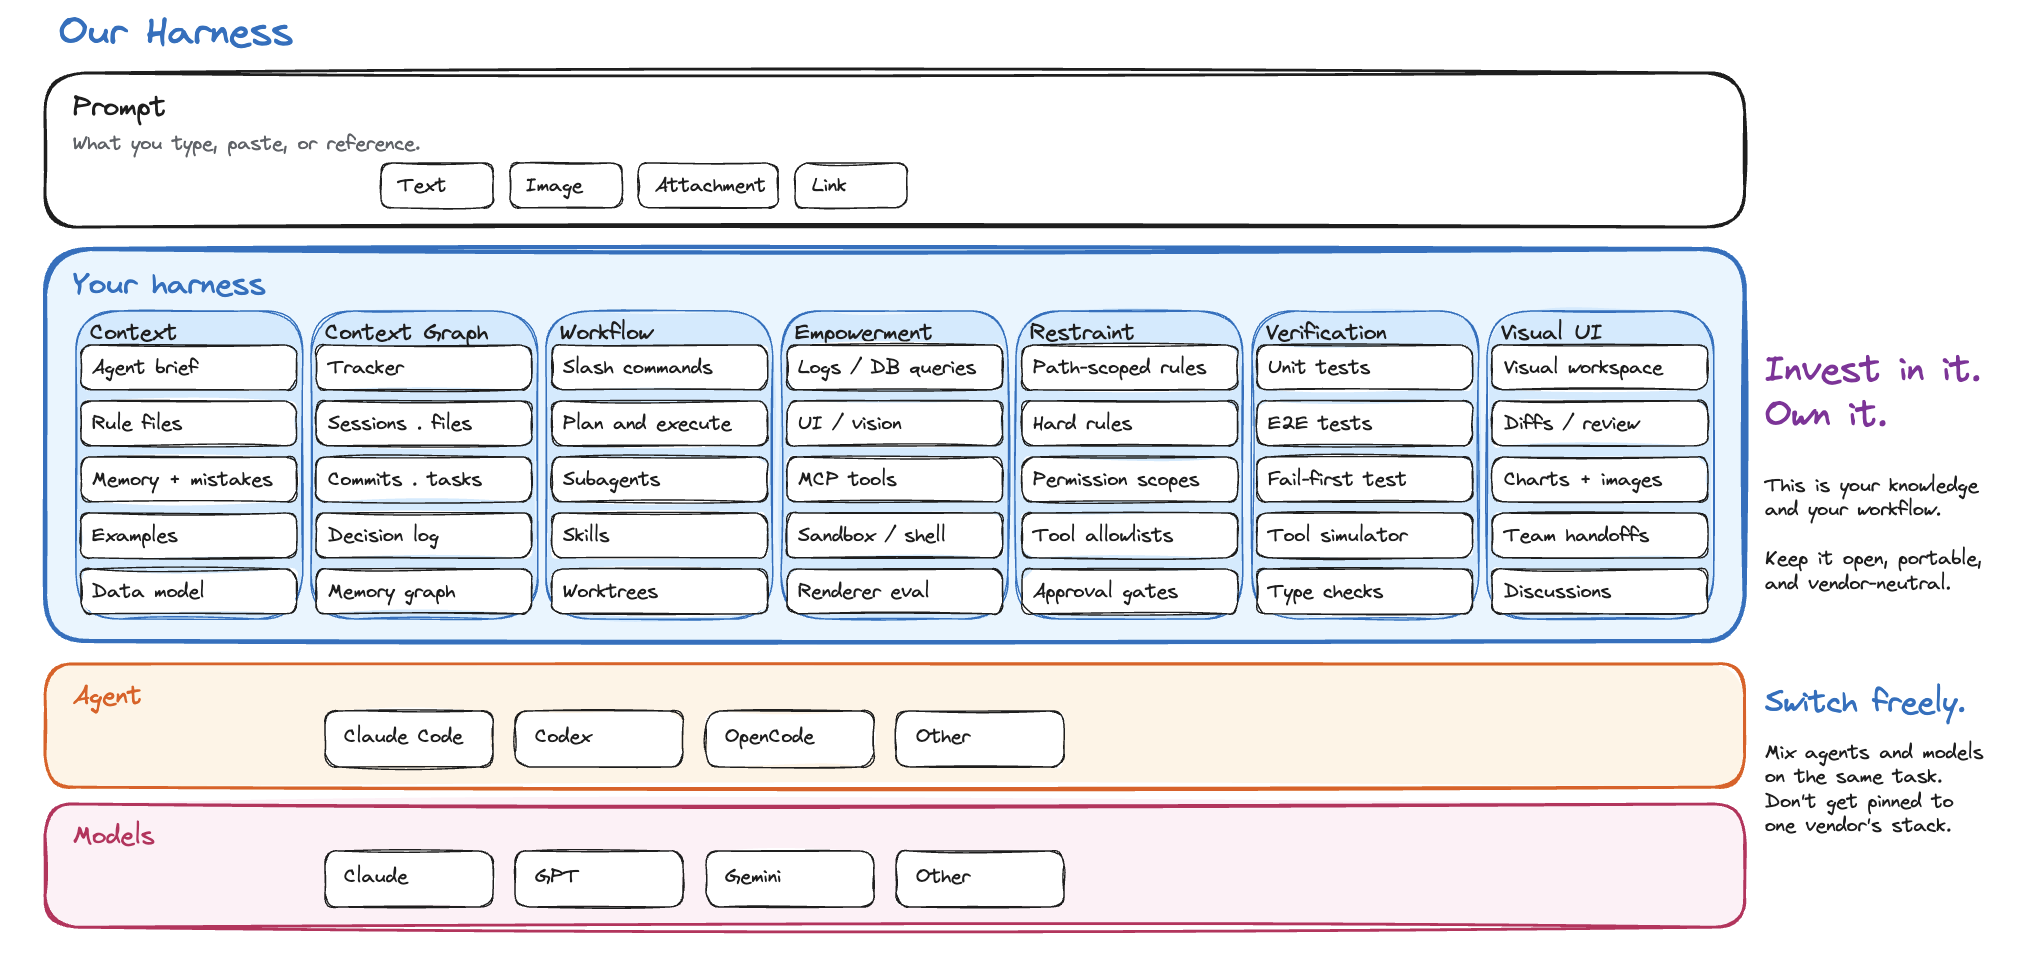
What a harness is
A harness is the durable layer around a model: instructions, tools, permissions, context, and verification.
Claude Code and Codex are harnesses in this sense. Each wraps a model with a system prompt, a tool surface, a permission model, and an execution loop. Anthropic and OpenAI own that layer.
Your team owns the next layer up: the workspace where agents do product work alongside you, with your files, tasks, diagrams, diffs, and decisions. This layer carries the knowledge your team has accumulated: how you build things, what you already decided, what is connected to what, where the agent is allowed to act, and how it checks its own work.
The line between context and harness can blur. A ticket or spec is task-specific context, but the mechanism that makes that ticket searchable, linkable, versioned, and retrievable by any agent is part of the harness.
Almost nothing in a good harness is novel. It is mostly other people’s parts assembled around your project: Claude Code, Codex, MCP, Playwright, a tracker, a diagramming tool, an editor, a test runner, your repository, your docs. The harness is the way those pieces are put together so an agent can pull the right context for a task and verify what it produced.
Eight failure modes resulted in 8 pillars for our harness
We arrived at eight parts of our harness addressed failure modes of the coding agent.
| Failure mode without the harness | Pillar that answers it |
|---|---|
| Doesn’t know your codebase, rules, decisions, or conventions | Context |
| Can’t traverse the links between artifacts that already exist | Provenance |
| Can’t act on the world or observe what it did | Capability |
| Reinvents how to do every task | Workflow |
| Does something dangerous because nothing stops it | Restraint |
| Hallucinates “fixed” without proof | Verification |
| Can’t show results back to humans in a useful form | Visual interface |
| The human can’t keep track of work happening across many agents in parallel | Coordination |
| The rest of this post walks each pillar and what we built for it. |
1. Context
Goal: know the project.
Failure mode this answers: the agent doesn’t know your codebase, rules, decisions, or conventions, so it solves every problem like it has never seen this project before.
Context is everything specific to our project: code, specs, design docs, tracker items, data models, past decisions, conventions, examples, and recipes.
In our harness that means:
- Code, specs, plans, and mockups live as local files in formats an agent can read and edit directly.
- Architecture diagrams live as Excalidraw files instead of screenshots trapped in a slide deck.
- Decisions are captured as tracker items, not buried in chat transcripts.
- Bug histories are searchable, so the agent can see symptoms, root cause, and previous fixes.
- Root instruction files like
CLAUDE.mdandAGENTS.mdload at session start and point the agent at the rest. - Path-scoped rule files load only when the agent touches a relevant directory, so React rules show up for renderer code and Swift rules show up for the iOS package.
- A skill system holds reusable instructions for recurring jobs: how we write tests, add analytics events, release a package, or debug a failing screen.
- Persistent per-user memory captures preferences and validated approaches across sessions.


An agent editing renderer code loads React rules without loading iOS rules. An agent fixing a regression finds the prior bug, the root cause, and the fix before writing code. Each session starts with the team’s accumulated decisions already in scope instead of being re-derived from the prompt.
2. Provenance
Goal: trace the why.
Failure mode this answers: the agent can’t traverse the links between artifacts that already exist, so the reasoning behind every change has to be re-explained or rediscovered.
Provenance is how code changes stay linked to the intent that produced them. A persistent, typed record of why each change exists, navigable from any direction: from the file, from the session, from the tracker item, from the commit. The underlying data structure is a typed graph of links between artifacts; the value is being able to ask “why is this the way it is?” and get an answer.
In our harness that means:
- A typed link graph between tracker items, plans, specs, diagrams, mockups, sessions, diffs, files, commits, and decisions.
- First-class editors for those artifacts inside the same workspace, so links resolve to actual working content.
- File-edit history tied to the session that produced it, so any file shows the conversations that wrote it.
- Tracker item types for the different kinds of intent the team carries: bug, feature, decision, plan, incident.
- Decision tracker items that record why an architectural choice was made, so a future session asking “why is this the way it is?” gets an answer instead of guesswork.
- Bug tracker items filed as we find issues, before fix code is written, so the symptom and root cause stay attached to the fix.
- An MCP surface so different agents can traverse the same graph during a session.


A bug can link to the failing screenshot, the fixing session, the diff, and the commit. A feature request can link to the plan, the mockup, the implementation sessions, and the release note. Git captures what changed. Provenance captures why and how we got there.
3. Capability
Goal: act and observe.
Failure mode this answers: the agent can’t act on the world or observe what it did, so it stays trapped in the text channel and asks the user to run every command and paste every output.
Capability covers tools that let an agent act on live state and verify what it did: reading logs, querying a running database, driving the UI, taking screenshots, running tests, and looping until the result is correct.
In our harness that means:
- MCP tools that read live application logs and query the running database through the app instead of unsafe direct access.
- Tools to drive the application itself: restart, reload, install extensions, hot-reload code.
- A renderer-eval tool that runs JavaScript inside the running UI to inspect DOM, state, or atoms.
- A screenshot tool that captures the rendered content of any open file.
- A Playwright-driven UI loop so an agent can interact with the running app, take a screenshot, and verify the result.
- MCP tools that wrap third-party systems the agent uses every day: GitHub, the analytics dashboard, the browser, the tracker.
- A sandboxed shell so the agent can run tests, scripts, and safe codemods, and run
wrangler tail,curl, andghinstead of asking the user to paste output. - An extension SDK so teams can write their own MCP tools and ship them inside the workspace.


After changing a React component, the agent can open the screen and check a screenshot. After changing persistence logic, it can verify that the row actually changed. An agent that can act on the world and observe the result can often close its own loop.
4. Workflow
Goal: reuse the arcs.
Failure mode this answers: the agent reinvents how to do every task, so the same kind of work takes a different shape every time and the basics have to be re-explained per session.
Workflow is the shape of a coding session: how it starts, how it plans, how it gets help, and how it parallelizes.
In our harness that means:
- Repo-local slash commands in
.claude/commands/for the steps we run over and over: plan, implement, review, release. - A standard plan-then-execute arc for non-trivial work, so the agent commits to an approach before changing files.
- An investigate, design, implement progression so research and planning happen as their own steps instead of getting interleaved with code.
- Subagents for exploration, planning, and implementation that take broad searches and protect the main session’s context.
- A skill system for reusable habits like writing tests, adding analytics events, or releasing a package.


A /release-alpha command runs the version-bump, changelog, and tag steps the same way every time. A /investigate followed by /design produces a plan document the next session can pick up from, instead of starting over from a blank prompt. A workflow layer keeps each session from reinventing itself.
5. Restraint
Goal: stay in bounds.
Failure mode this answers: the agent does something dangerous because nothing stops it, and a capable agent without restraint does it faster than you expected.
Restraint is how we stop an agent from doing the wrong thing quickly. It covers hard rules, approval boundaries, permission scopes, tool allowlists, budget limits, and an audit trail.
In our harness that means:
- Path-scoped rules that block agents from editing specific files or directories.
- Hard rules in instruction files for things the agent must never do, like reading
.envfiles or touching credentials, each with the past incident that taught us why. - Per-tool permission scopes and allowlists.
- Approval flows for actions that touch shared or costly state: push to
main, drop a table, hit a paid API, or run a destructive shell command. - Workspace trust modes that separate “can edit files” from “can do anything.”
- Durable audit trail of approvals, tool calls, and file changes.
- Review surfaces that make it obvious what the agent actually changed.


In practice, that means letting an agent refactor renderer code but not release scripts, query a development database but not production, and spend tokens on test loops without touching paid third-party APIs unchecked. Restraint is the paired pillar to capability. Every new tool we give the agent needs a matched scope, or it becomes a liability the moment the agent reaches for it in the wrong context. We build the two together.
6. Verification
Goal: prove the fix.
Failure mode this answers: the agent hallucinates “fixed” without proof, so a confident announcement and a working change are two different things.
Verification is how an agent proves a change works before handing it back. It covers tests, type checks, fail-first reproduction of bugs, and simulated runs of the agent’s own tool calls.
In our harness that means:
- A failing-test-first discipline: write the failing test before writing the fix, so the bug has a reproduction the next agent can rerun.
- A Vitest unit suite that runs across packages and gives fast feedback on logic-level changes.
- Playwright end-to-end tests for real flows, one spec per run so a failure points at one place.
- An AI tool simulator that lets E2E specs fake AI tool calls and assert on what the agent did, without paying for a real model.
- Fast type checks baked into the loop so the agent catches drift before tests even run.


A fix for a sync bug starts with a Playwright spec that opens the broken document and asserts the body loads, then the agent fixes the code until that spec turns green. A renderer change runs the unit suite and the type check before the agent claims it is done.
If the agent cannot show the change works end-to-end, it is not done.
7. Visual interface
Goal: show the work.
Failure mode this answers: the agent can’t show results back to humans in a useful form, so decisions, diffs, and artifacts vanish into a wall of chat text that nobody reviews properly.
A lot of software work is visual. Markdown review, UI mockups, architecture diagrams, data models, diffs, screenshots, and sketches are part of the task input, not presentation garnish, so they belong in the workspace where the agent does the work.
The visual interface is where the agent works and where we review what it did, in the same place. Voice, interactive prompts, and walkthroughs are channels the same workspace orchestrates when text or a static visual is not the right format.
In our harness that means:
- A workspace where the mockup, the diff, and the tracker item sit side by side, so the thing being reviewed and the place the agent works are the same place.
- A markdown editor with red/green diffs for agent edits, plus diff review across every file the agent touched in a session.
- Mockup, diagram, and data-model editors as first-class file types, with image and screenshot inputs the agent can read and produce directly.
- Inline charts and rendered screenshots returned in the conversation, so numeric results and UI changes do not vanish into a text wall.
- Approval gates on risky actions like merges, deploys, and pushes to
main, with the diff and linked tickets shown in one view before approval. - Threaded discussions tied to tracker items, diffs, and decisions, so the reasoning lives next to the artifact instead of vanishing into a chat tool.
- Durable interactive prompt widgets for branching decisions, multi-field input, and approvals, so a blocking question survives navigation and restart instead of getting buried in chat.
- Walkthroughs and tooltips layered over the same UI when the agent needs to guide the user through a flow.
- A voice channel for the same session when the user wants to listen and talk instead of read and type.
- Team handoff posts when a session ends, summarizing what shipped, what is still in flight, and what risks remain.


The agent can edit a mockup, render it, compare the screenshot to the request, and then review a red/green diff before merge in the same workspace. A visual workspace keeps decisions attached to artifacts instead of burying them in chat.
8. Coordination
Goal: track every agent.
Failure mode this answers: the human running multiple agents in parallel loses track of who is doing what, where, and why. Work goes into a tab graveyard with no shared memory or hand-off.
One agent on one session is the starting point. Real product work needs many: a planner, an implementer, a reviewer, a researcher, a bug fixer, sometimes a dozen sessions running in parallel on different branches. Coordination is how the human running all of that keeps a single overview: who is doing what, where the hand-offs go, which sessions touched which files, and what’s still open.
In our harness that means:
- Sessions with persistent metadata (name, tags, phase) listed on a kanban board, so the team can see what every agent is working on at a glance.
- Workstreams that group related sessions on the same problem, so a bug that took five sessions to track down stays connected.
- A meta-agent so one session can spawn and supervise others: parallel reviewers across pull requests, a sibling session to verify a fix end-to-end, long-running background work that checks back in.
- Git worktrees and isolated dev instances so multiple agents can edit the same repo without stepping on each other.
- Hand-off briefs when a session ends or spawns a child, so the next session inherits files, links, and constraints instead of starting from a blank prompt.
- File-edit history tied to the session that produced it, so overlapping work is visible before it turns into a merge conflict.


A bug triage session can spawn a sibling to reproduce the issue in an isolated worktree, then a third to write the failing test, then a fourth to implement the fix on a feature branch. Each one inherits the relevant slice of the parent’s context, runs in parallel where it can, and reports back into the same workstream. With this pillar, the harness itself tracks who is doing what, where, and why.
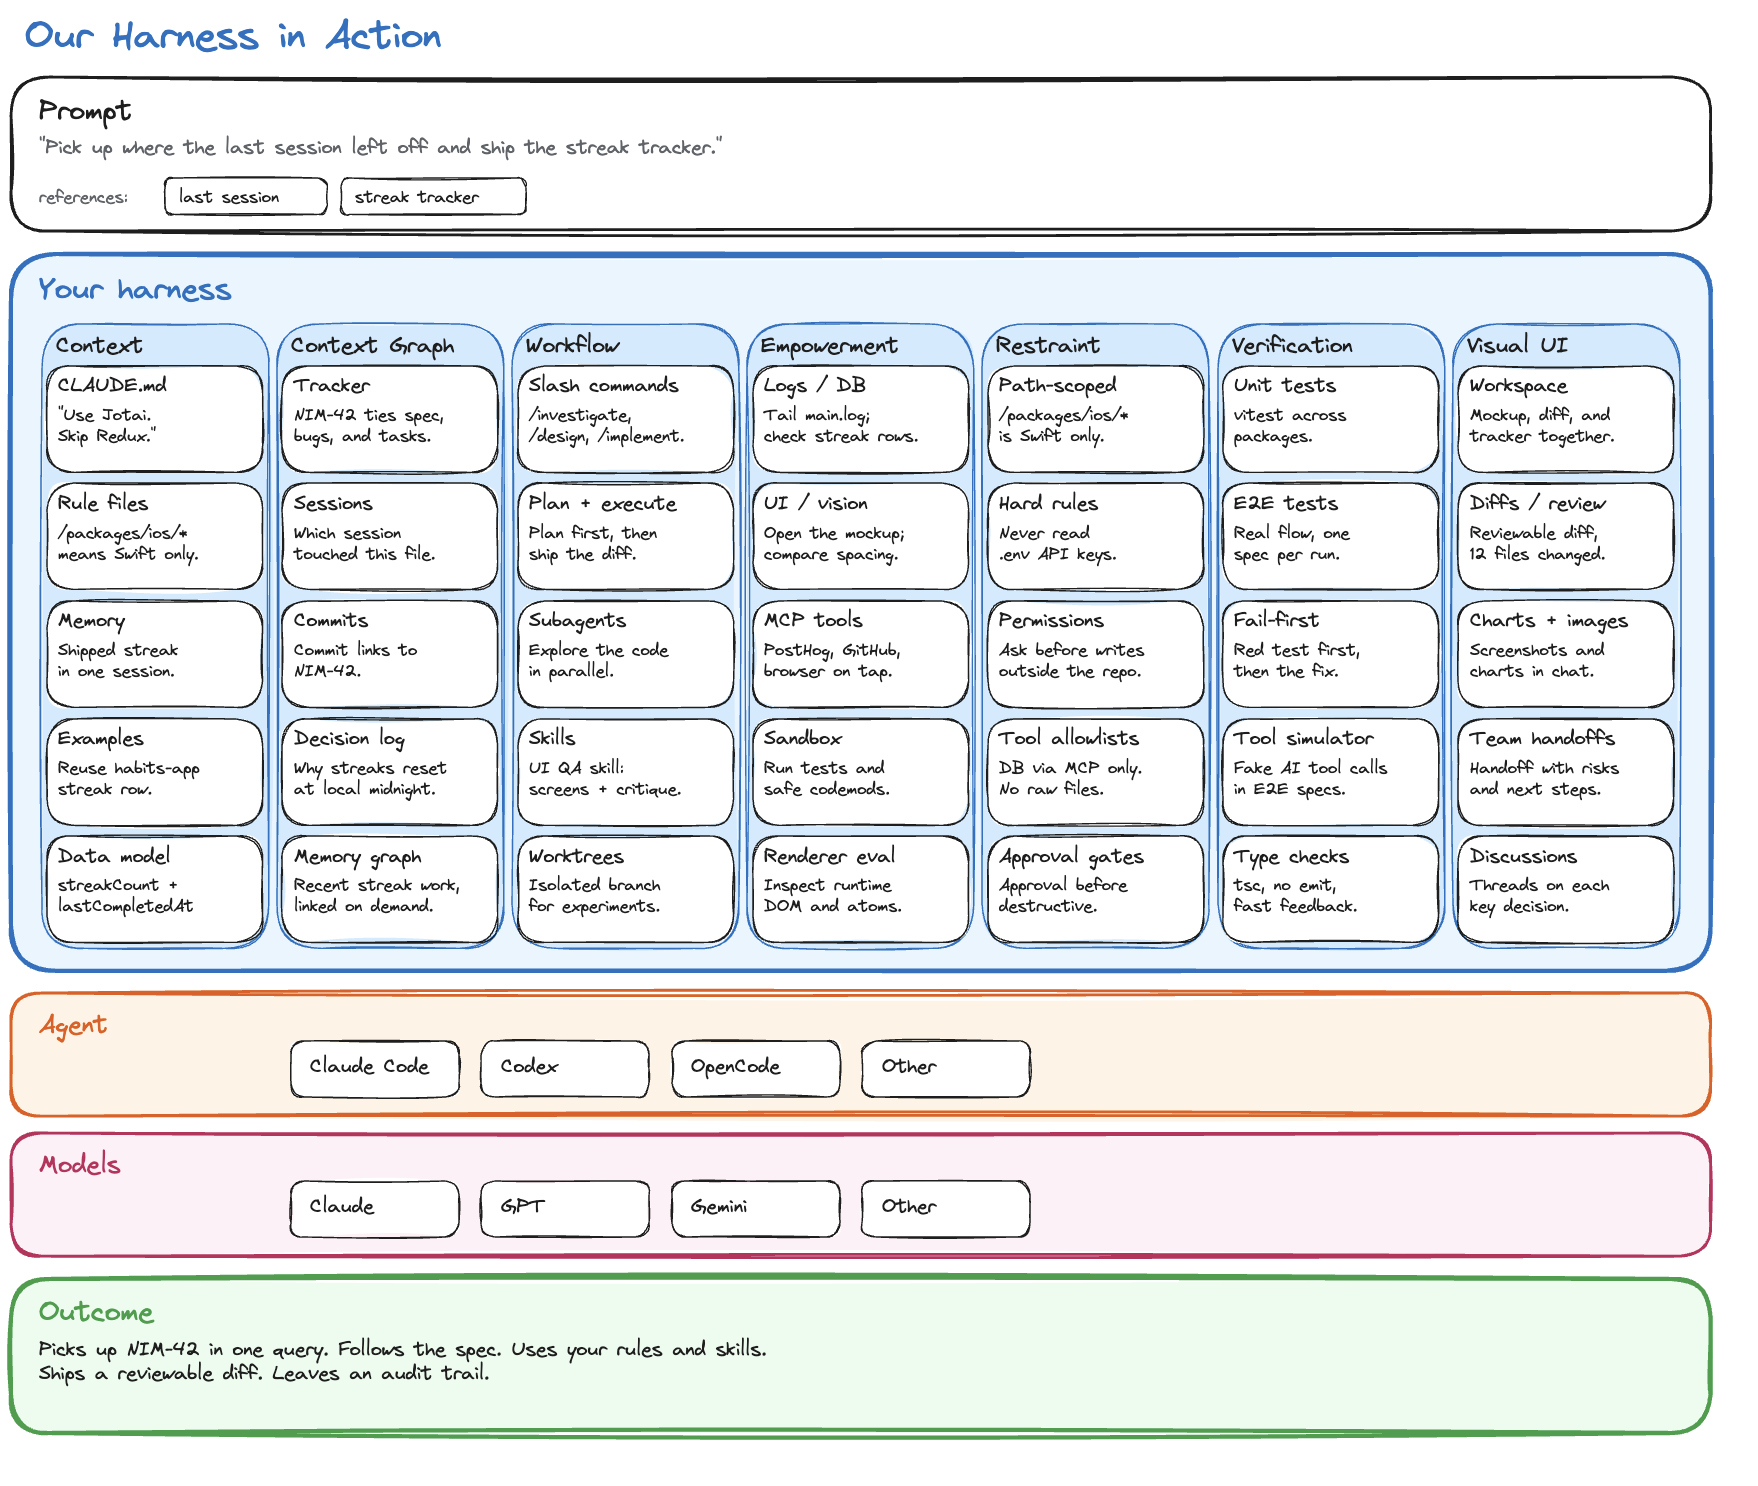
One bug, all eight pillars
A worked example, drawn from a real workstream we ran. The bug: after a restart, a synced tracker item showed up with an empty body. The body was there in the local database, but the server-side collaborative document had been seeded wrong, so the next session that opened the item saw nothing.
How the eight pillars showed up:
- Context. The session loaded
CLAUDE.md, which pointed it at the sync architecture doc and the CollabV3 data-isolation rules. A path-scoped rule about Y.Doc seeding loaded automatically because the session touched the sync directory. - Provenance. The bug was filed as a tracker item linked to four prior sessions that had announced “fixed” and were not. Opening the tracker showed the chain in chronological order, so the new session inherited what had been tried instead of repeating it. The eventual fix went into the tracker as a closing note linked to the commit and the Playwright spec that proved it.
- Capability. The agent queried the local database through the MCP tool, ran
wrangler tailagainst the sync worker to watch server-side activity in real time, and read the main process log to find atry / catchthat had been silently swallowing the seeding error. - Workflow. The session ran as
/investigatefirst, then/designproduced a plan document innimbalyst-local/plans/, then/implementexecuted against it. - Restraint. The session had read access to the production sync worker but not write access. Every commit went through an approval flow, not a direct push. Restart was on the user, not the agent.
- Verification. The first deliverable was a failing Playwright spec that opened a fresh client, seeded a tracker item on the server, restarted, and asserted the body loaded. The spec failed red. The fix turned it green. Only then did the agent announce the bug was fixed.
- Visual interface. The agent posted the red-then-green test output inline, a screenshot of the tracker view showing the body restored, and a structured interactive prompt widget in the same workspace asking whether to merge or hold for further review.
- Coordination. The session was the fifth in a workstream that had spent multiple days on this bug. It read the parent workstream summary and the linked sessions before writing any code. When it finished, it filed a hand-off brief for the next session to confirm the fix held across a multi-day soak.
The bug took one focused session to close because every pillar carried its share. Any one of them missing and the same workstream would have continued.
What changed once our harness covered all eight pillars
Once we had these pieces in place, a few things changed:
- Sessions resumed from prior context without re-prompting the same background every time.
- A single prompt could pull in the linked plan, prior session, spec, and affected files through one graph traversal.
- We could switch the same task between Claude Code and Codex without rebuilding the workflow above them.
- Permission scopes and the audit trail made it practical to let agents run through multi-step work and review after the fact.
- Agents could verify their own UI and backend changes through screenshots, log queries, and test loops before asking for review.
- The useful parts of a session stopped disappearing with the chat window because the decisions, links, and artifacts remained in the workspace.
- Parallel sessions on the same problem stayed coordinated through workstreams and the meta-agent, instead of each one rediscovering the others’ work.
- Each agent session resulted in better results more quickly
We regularly review transcripts for repeated mistakes and feed the patterns back into rules, linked context, and CLAUDE.md, so the next session does not relearn the same lesson. Decisions made during a session land in the tracker. New skills get written the moment we notice ourselves explaining the same convention twice. The harness gets better every week without anyone setting aside a “harness sprint.”
Here is what the eight pillars look like filled in for a single concrete prompt:
Recommendations from our experience
If you are building your first harness this week
Do the boring parts first. They compound the fastest.
- Put your specs, plans, diagrams, and checklists in files the agent can read directly.
- Add one root instruction file and a small number of path-scoped rules.
- Give the agent at least three capability tools: logs, tests, and browser or screenshot access.
- Add approval gates for destructive, expensive, or shared-state actions, so capability and restraint grow together.
- Link tickets, docs, files, sessions, and commits so future runs can traverse prior work.
Doing those things already moves you from “chatting with a model” to “operating a system that gets better over time.”
Multi-agent coordination is a second-quarter problem, not a first-week one. Get one agent reliable first, then worry about how many work together.
If you already have a harness, invest in it
Treat the harness as a product your team ships to itself.
A meaningful share of your AI effort should go into improving the system around the model, not just consuming completions from the model. That means writing better rules, wiring up better MCP tools, recording better decisions, adding better examples, tightening the verification loop, and once you have more than one agent running, giving them ways to coordinate.
Pick one shape of multi-agent coordination, even a simple one: a kanban of sessions, a habit of spawning sibling sessions for verification, or a workstream tag that groups related work. Multi-agent ergonomics compound the same way single-agent rules do.
Pick a percentage of your AI effort that goes to the harness instead of feature work, protect it, and make sure every release cycle includes at least one improvement to one of the eight pillars.
Every rule, tool, example, and link makes future sessions cheaper and better.
Own your harness
You should own your harness: instructions, rules, tool definitions, links between work items, audit logs, reusable skills, and the way your sessions hand off to each other.
If you cannot read it, edit it, version it, point a different agent at it, and take it with you, it is not really yours.
This matters more as models get closer to feature parity. As they converge, the advantage moves up a layer, into your accumulated workflow, your verification loops, your linked decisions, your team memory, and the way you organize a team of agents.
Keep your harness portable across coding agents
Model competition is healthy, and you only benefit from it if your harness is portable.
When a new coding agent arrives, your team should be able to point a session at it without rebuilding the workflow above it. Claude Code today, Codex today, something else tomorrow, with the same files, same rules, same tools, same graph, and same multi-agent shape underneath.
If switching the underlying agent means rebuilding your harness, then you do not really have optionality.
Test the framework against your own failures
The eight-pillar framework is one we arrived at by collapsing every recurring failure mode we hit into the smallest set of pillars that named each one exactly once. Yours might differ. The test we use: can you name a recurring failure of your agent that does not map to a pillar? If yes, the framework is missing something. Can you collapse two pillars without bringing a failure mode back? If yes, you have one too many. Use your own incident log as the source of truth.
Nimbalyst can be one starting point for your harness
Nimbalyst is our open source workspace we use to assemble our own harness across these eight pillars. It lets us run multiple coding agents side by side, so we can point a task at Claude Code, Codex, or whatever lands next without rebuilding the layer above them. The visual workspace, the provenance graph, the capability surface, the file-based instructions, the session model, and the multi-agent coordination are all visible and inspectable.
If you want to see our actual implementation in detail, including the specific files, rules, MCP tools, slash commands, and tracker workflows we use day to day, the living catalog lives in our repository at docs/THE_HARNESS.md. The in-repo doc organizes the implementation slightly differently, but the parts are the same.
Use Nimbalyst directly or inspect it and learn from what we have done there.
Related posts
-
The Best Agent Harness for Claude Code and Codex
A practitioner's guide to building an agent harness for Claude Code and Codex in 2026, what one is, and how to pick a harness that survives model churn.
-
Integrate 80% of everything for agent and human context
Shipping one feature with a coding agent touches seven tools. Why context has to be a graph and editors have to share a workspace to close that gap.
-
Best Tools for Agentic Coding in 2026
A practitioner's tour of the agentic coding tool landscape in 2026, covering terminal agents, IDE agents, workspace surfaces, and unsolved gaps.